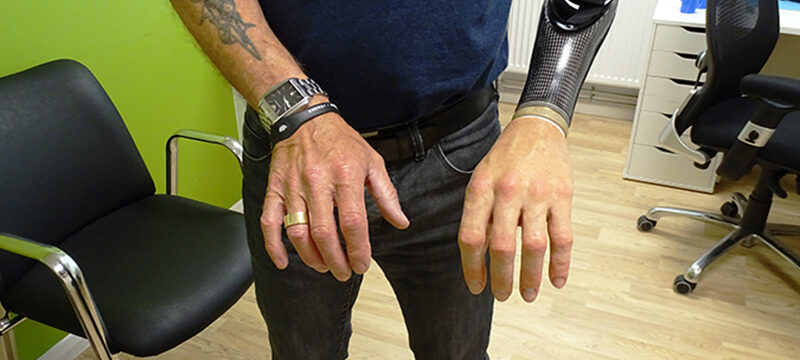
Alex Paterson - Spot the difference!
After a series of discussions, Alex opted for a bespoke silicone hand for his existing arm prosthesis. Handmade, colour-matched silicone prosthetics is something Dorset Orthopaedic is renowned for globally. We have many years of experience making everything from tiny fingertips to full-length trans-femoral leg covers for clinics all over the world.
Colour Match: The first stage in any silicone prosthetic is a colour-match appointment. We start by taking an impression of the sound side hand or foot we will be replicating. In the case of upper limb amputees, this gives us all the information we need about the shape and length of the client’s fingers, the dimensions of their hand and what level of creases, wrinkles and veins to apply. Next we make notes on details such as hair, follicles, freckles and nail colour. We try to match as many details as are evident on the client, as all of this adds levels of depth and realism to the final product. Finally, we custom match the client's skin tones as closely as possible - often a challenging task as hands change colour with blood flow and temperature more than you would realise.
Manufacturing the silicone prosthesis: We tend to use an off-the-shelf prosthetic hand to form an under-structure for our work. Using the client's hand cast as a guide, we manipulate this to give the correct position and curvature of the fingers. We reduce the hand to create a scaled down version and the coloured silicones we add on top will bring it up to the correct size.
Flesh tones: The silicone is added in layers, colours being added in the position noted down in the client's colour match appointment. The product looks very rough at this stage, as we are simply building up the shapes and the colours will be carefully blended together later. The nails, which have been created separately, are then added at the correct point on the fingers.
When everything is in the correct place, we can add skin details. For Alex's hand there are some raised veins on the top of the hand and at the top of the fingers. We also added some light freckling in this area. Once the colours have been blended and we are happy with the shape and bulk, the product is smoothed to prepare it for the next stage.
Pinks: All of the pink on the knuckles and the colours inside the palm are applied next. This is done by applying thin layers of colour onto the flesh colour underneath. We blend the layers out to make them look natural. The pinks have been noted down in the colour match appointment, so we know how much to apply and where. This stage really starts to bring the product to life! Once these colours have been applied, we can add details such as the lines on the knuckles and the creases on the palm. The hand is checked over again to make sure the dimensions are still correct and we neaten up areas such as around the edges of the nails.
Cosmetic check: The level of detail in a silicone prosthesis means there is no substitute for seeing it in person. For silicone clients at our Southern or Midlands clinics, we offer the opportunity for them to come in and see the silicone prosthesis before we complete the manufacturing process. We can then make small tweaks and adjustments with the client present. This gives us the best chance of matching them as closely as possible and creating something that is exactly what they want. In the case of Alex's hand, we added some hair to the back of the hand and a little to the fingers as well.
Delivery: Once the silicone has been hardened, it can be made ready for the client by neatly trimming any edges and smoothing the inside of the product. Alex attended the Midlands clinic to receive the finished arm and the fitting was performed by Alex's prosthetist James Buckett. The silicone hand is detachable, meaning the same arm can be used for different functions as desired. Alex was very satisfied with the final outcome and we wish him well with using it in the future.
